Saturday, December 10, 2011

Building hives and More Inspections

I recently ordered an Oshlun stack dado blade.
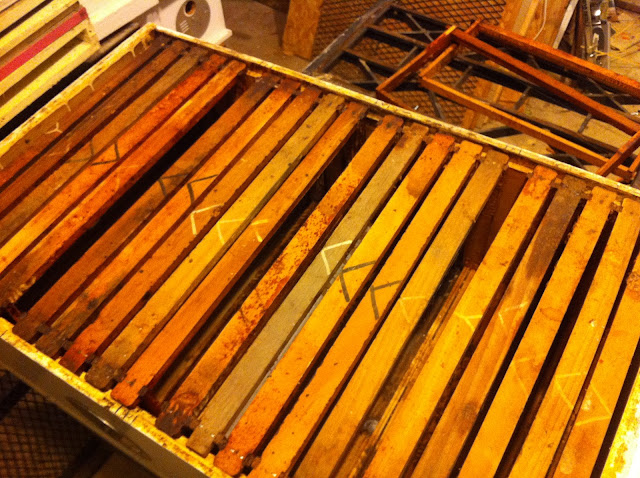
What you're looking at is 124 (+/-) teeth of fury!  I'm going to use it to cut frame rests and rabbets for hive boxes as well as use it to cut dadoes for dividers in queen castles and nucs.  This is a pretty good quality dado blade and makes good quality stuff.  The cutters have 44 teeth and the chippers have six teeth each.  This makes for a very heavy set and the motor takes about five whole seconds to spin it up.  But it works fantastically, and I'm going to use it a lot as I'm building my new legion of medium boxes.

Here you can see my design for a 4x5 nuc, that's four five frame nucs in one box.  The last thing to add is the dividers.
I did a test run with the dado blade and made some ends for a 6 frame nuc.  All I need to do is cut the sides and make a bottom and lid and it will be ready to go.  Now that I think about it, it would make a perfect example for my first six frame medium nuc, possibly to overwinter.

Finally, here is evidence that given the opportunity, bees will size the entrance how they want it.
This is a hive in my outyard where the bees reduced the entrance even further than I had reduced it.  As you can see, they still didn't close it all the way off.  For context, this hive has a 1 1/2" round entrance near the bottom.

Another hive on this pallet seems to me to be burning too brightly.  By that I mean they are too big and using their stores too fast.  I hope they can slow it down and last the winter.  On the other hand, they are a bit mean, and with that in mind, I doubt I would breed from them.

Friday, December 9, 2011

First Deadout of Winter

Here's today's yard.
 Sad news, today I discovered my first deadout of the winter.  I've gotten better at knowing a deadout without even looking inside.  Bees will be coming and going, but they will be acting more like robbers and in this case, they will be trying to use the lower entrance which this hive never took to.  Around here, dead hives not uncommon for this time of the year, but the reason varies.  Let's look at some of the signs.  What's left of the hive (all the uncapped honey) is located in the back middle of this picture.  I figure any hive able to be out flying through the winter can have all the honey they can carry home.  The hives headed by the queens I ordered from Zia seem do be flying just fine in 45 degree temperatures.

The first thing I found was this in the second box from the bottom.
At first, I thought the hive was queenless because the queen wasn't in this cluster.  There was a hive beetle though.  There was also plenty of honey around the cluster, though it was uncapped.

As I began to take the hive apart and take stock, I found this right at the top of the hive right under the sugar.  Like the lower cluster, they were surrounded by uncapped honey and you can see in this picture just how close it was.  They also had a very healthy supply of pollen.

There the queen is.  She looks like a standard Italian if not just a little dark complected.  This hive was a swarm I caught last spring, and I saw old used queen cells in the hive so I assume this is not the queen that swarmed with the hive.

I also took a good hard look at the bottom board.  That's one of the most important things to look at.  There were about half a dozen beetles and about two dozen mites.  Neither of these things is likely the source of the demise of this hive.  There were dead bees, but not enough to form a solid layer across the bottom.

The primary issue with this hive seems to me to be a divided cluster.  But the question must be asked as to why their population is so low.  I checked my records and this hive was designated SW-NWA-0000-0004 meaning that it was a swarm from around here with unknown parentage.  This hive mysteriously showed up clustered under my comb melting vat last year.  It made it through last year well enough, but had a tough start this spring taking heavy damage from skunk predation.  This apparently triggered a supersedure this spring.  Later on, the hive was healthy enough to harvest three frames of honey from to supply some new nucs.  This hive did show some minor signs of dysentery this spring, but every thing cleared up.  By fall inspection time, they were just about the least provisioned of any of the hives and I put a top feeder on.  They did not take much syrup, and I found what they did take (it was dyed) on one of the combs.  Most of what they had was real honey.

I did my best, but this hive was never a performer.  Perhaps in the future, a hive like this will be placed in a nuc or combined with another hive so that it won't be taking up valuable equipment.  However, at this point, I have plenty of equipment so it's not really an issue.  They ended up being comb babysitters more than anything.  So far, survivors are 10 of 11.  Let's hope there will be very few more deadouts.  It's another big splitting year next year.

Saturday, December 3, 2011

Mating Nucs

Here's today's photo, taken just a few minutes ago.


 Today, I'm here to talk to you about mating nucs, specifically of the 'queen castle' variety.

A queen castle is a type of nuc which contains only two or three standard frames.  It's purpose is to provide the function of the mating nuc while eliminating the need for an extra type of frame.  Some nuc designs use half size frames or tiny little topbars.  The question is what to do with these things at the end of the year, or how to get the bees to build on them in the beginning.  With standard sized frames, queen castles eliminate this difficulty.

Its prime use as a mating nuc is generally set up like this.  Standard methods are used to rear queens to the ripe cell stage.  Then, a frame of brood and bees and a frame of stores are placed in the queen castle with the ripe cell.  Later, the nucs are checked to see how the queen is coming along and if she's laying eggs and ready to be sold.  She can be removed and replaced with another cell repeatedly throughout the productive season.  I've been told that the 4x2 versions offer limited space to squeeze the cell in.  But according to my measurements, the three frame version offers a full 5/8" of space with normal frames.  Using narrow endbar frames offers an extra 3/8" on top of that.

Another benefit is for swarm control.  For instance, you go out to do a standard springtime inspection one day and you find a hive that is near to swarming with queen cells on four separate frames.  This presents a fantastic opportunity to get some free bees.  Take the queen and a couple frames and start a nuc with her off to the side.  Then take three of the frames with adhering bees and place each of them in the queen castle in separate compartments.  Add a frame of honey and pollen and an empty frame of comb or foundation.  Close the thing up and wait a couple weeks and you have new nucs.  You have the original queen in her nuc, one queen in the original hive, and three queens in the queen castle.  You can then use these queens to requeen other hives or use the nucs to start new hives.  You can also cut cells out and profit even more by using the method above.

Typical queen castles available at beekeeping supply establishments are the deep 4x2 and the medium 3x3.  These two designs allow just about the same amount of comb space.  Below you can see the design I came up with which in all probability is identical to the one Brushy Mountain offers.  It features a standard sized box which can be used as such during the rest of the year, and three nucs divided by pieces of 1/4" luan plywood.
Here's the detail of the end piece.  The side pieces are simply cut with no special dadoes or rabbets.  The end piece is cut by two 1/4" dadoes and two 3/4" rabbets on the ends.  The frame rest is the standard 3/8" by 5/8" cutout.  All cuts are 3/8" deep from the broad side.


This is the design, but I'm going to be using it a little differently.  I designed it as a medium even though I have all deeps at this point.  But as you know, I'm making the switch to mediums.  I'll build these as deeps and then at some point, I'll begin cutting them down to medium size.  It's a simple three inch difference.  The other part is that I'll make them about 1/4" taller than standard and attach the bottom board semi-permanently in the same way my 10 frame nucs are.

One thing I saw on the Bushkill Farms version was a big circular screened over vent at the upper side of the nuc to draw robbers while the actual entrance is small and located away in the bottom corner.

I'll be building these over Christmas Break, and using them next year to efficiently boost my populations.