Thursday, February 28, 2013

Winter Prep - Bee Informed National Survey

I like to participate in the Bee Informed national survey (beeinformed.org).  It allows me to really see what helps and what hurts in beekeeping management.  Here is an example:


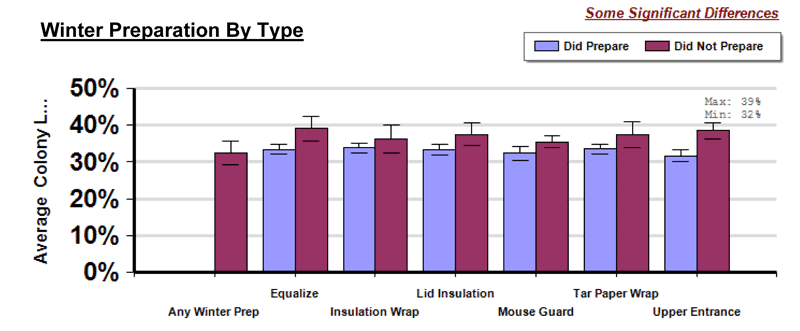
This graph shows how many people used different types of winter preparations and what their loss rates were.  Now you may say "All of the methods helped."  But rather than looking at the bar graph which is the average, look at the range denoted by the little black whiskers.  That's the actual range of results.  Statistical analysis dictates which difference is significant.  But you can usually tell by which whiskers overlap.

For instance, the range of values for tar paper wrap overlap, demonstrating that the results were not significantly different while the use of an upper entrance were.  In fact, the greatest differences were found among the Upper Entrance group.

The other three that were effective were the 'Equalize,' 'Lid Insulation,' and 'Mouse Guard.'  The use of insulation or wrapping in tar paper are not shown to have different results than not using those methods.

I've never used equalizing, but I have Robin Hooded honey rarely.  But I'm happy to say the ones that I have been recommending for years are effective, upper entrances and insulated lids.  Mouse guards are pretty obvious, mice crawl in and eat honey and make nests.  Upper entrances allow better ventilation and the release of humid air which can cause condensation.  Insulated lids keep that condensation from collecting on the roof of the hive and dripping water on the cluster possibly killing it.

And as I've said for years, the bees don't heat the hive but rather heat the cluster.  Insulation is largely irrelevant.
Wednesday, February 27, 2013

A New Year

Sorry, no pic this time.  Weather is dreary and cold.  I don't like winter.  I'm very glad it's short here.

So, what's up this year?

Well, great news thus far.  As of yesterday when I stopped by one of my outyards, I have 100% survival of my 23 hives.  After last year's survival numbers (10/11) I am really stoked that my methods are finally being proved to be successful.  Just in time for my tenth anniversary of the day I drove to Orland California and bought my first 20 packages of bees.

This year, I plan on continuing to do what I began last year. 

I will be making more queens and nucs:  I have talked to several of last year's customers and as far as I know, they've had 100% survival of my stock.  I already have around ten reservations for queens and nucs.  After making 30 hives out of 7 last year, I should be able to make easily as many this year and make a fair amount of honey too.

I will continue my switch to medium hives:  I just finished (minus paint) eight new medium boxes.  It was great to fire up the old table saw again, though somehow I bent the fence.  And it is definitely an old table saw, it's older than me.  But it's a quality machine, all cast-iron and whatnot.  I need to make more of my ten frame nucs, but in medium sizes. I need to start moving mediums to the outyards and deeps back home.  Selling nucs will get rid of my deep frames and I will need to buy more medium ones.

I'm not going to attempt to catch swarms:  Last year I expended a lot of time, effort, and resources to put up swarm traps and got less than 10% return.  Now that I have as many hives as I want, I don't need them anyway.

I will continue to grow the hives that I have:  I have about a dozen deep boxes remaining, totally empty, ready for foundation.  And after my incredible increase from last year, I have a lot of hives which will need supering very soon.  Right now it is cold and the foundation is brittle so I'm holding off on that chore for the time being.

Settling into final numbers:  I originally wanted to run 20 hives, but with two locations with space for 8 each and the home yard with space for nine, 25 sounds about right.  I shall have to be more diligent this year in the fall with combining weak hives.  Not that they have trouble wintering, they seem to do fine, but I want to focus genetics on hives that are a little larger and build up faster in the spring.

And of course, I'll continue to be obnoxious on Beesource.com.  I have to keep needling the naysayers, explaining that after all these years, it still can be done and I am still doing it.

Saturday, June 23, 2012

Bubbly Nectar

Here is today's picture of the yard.


It's been hot lately.  My twin 5-frame nucs like to beard as a group.

Interesting thing I discovered today and have never seen before.  See if you can spot it.

If you said bubbly nectar, you win!
 I've never seen this before.  By the odor wafting from the hives, I'd say it's fermenting nectar.  So what's the cause?  If I were to make a guess, I'd think about the following things.  First, what flowers are blooming right now?  Are their nectars troublesome?  The main things I can see blooming at this time are chicory and clover, neither of which have I ever heard of this problem. 

Second, are the bees unable to cure the honey for some reason?  This is a possibility based on a few factors.  First, high humidity would make it difficult to cure honey.  Second, poor ventilation might cause the same problem.  All the hives I noticed this problem in today were ones that have a single 1.5" circular entrance.  The problem was more pronounced in 5-frame nucs, but also seen in single deep hives as well.  It was not seen in hives with more than one entrance or those with a wide bottom entrance.  In fact, in the picture above with the bearding bees, those are the hives where these frames were found.  They were not bearding this morning however.

I don't have a solid answer, but I think the second scenario is more likely, that poor ventilation is causing problems curing the honey, exacerbated by high humidity here in Arkansas.

Tuesday, June 19, 2012

Cube Hives in Final Configuration

Harvested honey this past week, 17 gallons.  Here's a pic of the yard.


You can see the tan colored cube hives in the front middle. The one on the right is fully decked out and the one next to it is just getting going.

Wednesday, April 25, 2012

New Queens, Hives All Over the Place

 Here's the latest picture of the home yard.

There's been a lot going on and not enough time to write about it and a deficit of pictures to explain.  

But here's one that should explain a little.


These are the queen cells taken from my queenless starter/finisher.  As you can see, 11 of 18 made the cut.  In the queenright starter/finisher, 17 of 18 made it through.  I've decided to use the queenright method from now on.  It's much easier, very simple, and you don't have any of the downsides related specifically to queenless methods.  This small sample size also shows how well it can work for a first timer compared to queenless, however, don't trust just two tests.

After the cells were matured, I got out on a Tuesday morning a few weeks ago and robbed seven hives of all but one frame of brood to have enough brood to make up the mating nucs.  The mating nucs are 3x3 queen castles that I designed and built myself.
In each, I placed an empty drawn comb, a comb of honey, and a frame of brood with adhering bees.

You can see in the picture at the top of the page most of them.  Three are in other places around the property.  After the queens hatched, I removed the queen cells and cell protectors.  The JZBZ cell protectors don't fit over the cell, but they still can protect and be used as a way to attach the cell to the comb.

After checking them a couple times, I can safely say that the vast majority have mated and returned healthy.  I have found one where the queen didn't return and one where the queen has not begun laying.  Out of 28 cells, those are pretty good numbers.  The nucs are all brooding and the first weekend in May, I will begin culling, combining, and figuring out where they will all be going.

My goal is to go into winter with at least 25 hives and the extras will be sold as nucs.  So, not too long and there will be nucs for sale.

Monday, March 26, 2012

Grafting Success!


I had a somewhat exciting week, this past week, Spring Break.  I grafted for the first, second, and third times. 

Sunday night, I made up some cell bars using wax cell cups I purchased from Rossman.  Monday morning, I put them in the hive so the bees could get used to them.  I put 12 cups on at first.

On Tuesday, there seemed like there was going to be a break in the rain after it had rained for two days. During an actual break in the rain, I ran out to my chosen hive and did the manipulations for the Ben Harden Method, acquired the frame to be grafted from, grafted, and placed the cell bar frame back in the hive.  I added six more cups just for fun. 

The Ben Harden method is one in which you use a queenright colony to raise new queens.  To do this, you make two dummies, frames that are just solid wood which kind of concentration the action in the hive to just a few frames in the middle.  You put this setup above a queen excluder.  You then place a frame of pollen, a frame of young brood, and the cell bar frame in the box and nurse bees are supposed to come up from below and care for the new queens.  They are not supposed to reject them because the queen has never set foot on that cell bar frame and thus her scent is not there.  It's managed kind of like an engineered supersedure.


Later in the week, I checked.  Every single one had failed.  No takers.  I had a few ideas why, the rain was on the top of the list.  I should have had more patience.  Instead of nurse bees coming up to tend the brood, they stayed in the main brood nest as it was probably too cold to go meandering about the hive.  Fortunately though, I had placed an empty comb in the broodnest to replace the one I put in the upper box.  But I'll get back to that later.

So I left the cell bar frame in the hive and waited until Saturday when the weather should be excellent.  I made up some more cell bars, another frame with 18 and decided that I would retry the Harden Method and also do a batch with a regular queenless hive.  That frame that I had put in on Tuesday was now the perfect frame to graft from and to use to bait nurses up from below.  All the larvae were pretty uniformly on their first day out of the egg (some eggs remaining) and were the perfect age to be grafted.  Add to that the fact that the cups had been in the hive for half a week and were well polished and ready to go.

It's hard to tell in this picture, but the bees have begun to raise 17 out of the 18 grafted larvae.  Quite a good run.  Remember, this is in a queenright hive which can go about its business with no disruption in brood rearing or queenlessness.


I took pictures of the queenless hive cell bar this morning as well, but my phone focused on the grass in the background rather than the bees so the picture is out of focus.  But it looks almost the same except that they only took 12 of the 18 grafted.  I reason this is at least partly because the cells were not allowed to be polished by the bees before grafting.  You can be assured I will not make that mistake again.

Overall, this was a very successful excercise and one from which I learned greatly.  More updates soon.  In a week, it will be time to make up mating nucs and that is likely to be a monumental task.

As you can see in the picture at the top, the yard looks markedly different.  I've removed most of the real estate from the hives that are not doing what they should be doing at this time of the year.  The middle hive in the left row is the one wherein the Harden Method is being used, and the very back corner one is the queenless one.  Its queen is in the nuc behind the bricks to the left of it.  All the honey stored from last year in the puner hives is being stored on the big nasty hive in the front.  This year, it is the designated honey producer.  It is a very active and healthy hive, but a little too mean to breed from.  Such a shame.

29 mating nucs is going to be a marathon!


How Many Mites?

Here is a picture of the bottom board of a hive I took apart on Saturday.

If you right click and select 'View Image' you may be able to see the number of mites there are on this bottom board.  There are tons, hundreds, maybe as many as a thousand.  This is what I would expect to see on a bottom board from a hive that had died from varroa mites.

But this hive not dead.

This is the hive that I expected to die last fall due to an extremely high mite load.  I remember inspecting this hive and seeing mites everywhere.  I saw them crawling on bees, in cells with brood, crawling across the comb, everywhere.  There were hundreds.

I expected this hive to die.  But it didn't.  Remember, this is a completely treatment free hive.  No treatments ever.  And yet it survives, even with a massive mite load.  Admittedly, it's not doing great, but we shall see what happens.  This is one of the reasons I let hives die on their own, to see exactly how much they can take and if they have what it takes to survive.


Thursday, March 15, 2012

The Double Queen Hive Returns!

Latest picture of the home yard: like five minutes ago.
 As you can see, I got the 8-frame hive in today.  And the double wide is a double double.

But back to the double queen hive:
I guess I missed a queen cell when I was in the hive a few days back.  They seem intent on superseding this queen for a third time.  The first one I took and put in a hive that was queenless last year.  The second one is now in a hive of her own.  I think I'm pushing my luck if I don't let this one be.  Plus it's obvious the old queen is not a high performer by herself.  In fact, due to the timing, this new virgin may actually be her granddaughter.  She's certainly different colored, more like the locals than the original or her daughter. 

It may be an interesting trait of this hive though that the old queen is not disposed of even when it's obvious that she's not pulling her weight and I wonder why that is.  I wonder if her daughter or granddaughter will keep it.  I don't think the old queen is laying many eggs at all though she's not yet a drone layer.  Tell me what you think.

Sunday, March 11, 2012

The Cube Hive Makes its Debut

Sorry, I don't have a 'what the yard likes like' pic, I keep forgetting lately.  I've been working on expanding my egg operation to two dozen a day.  Actually, you'd probably be able to see the edge of the chicken yard in such a pic.  I have a movable poultry net fence.  It allows the chickens to eat more bugs and less feed, which is good.

But on to the topic du jour, the Parker Cube Hive.

 Here, you can see the basic form of the hive.  It is intended to be all mediums as a 14 frame medium is about the same comb area as a deep.  A 12 (regular) frame deep is heavy as is, without any bees in it at all.  But all I had was deeps with bees on them, so I had to build a deep to use for transition.  The bottom is a purpose built box, bottom attached, 1.5" hole entrance.  Eventually it will probably have a disc entrance on it for skunks.

The top is a Michael Bush style top, just a piece of plywood (though thicker than he uses) with two shims to elevate one end.  Just for fun, it has a bevelled edge on the front, maybe to keep rain and snow out.  I don't know, I didn't design it that way.  I just happen to have a piece of plywood left over from building my chicken coop and it had an angle on it.

I have two hives made up, two purpose built bottoms, two lids, 6 supers, 1 deep.  The purpose in my mind for this project is to see if placing successive boxes with frames at right angles to each other will have any effect.  I'm also wondering if square boxes will have any effect on cluster size.  A side benefit is that for the same comb area, using boxes with extra frames results in significantly shorter hives.


Here's the entrance.  In it, you can see the bottom end of the PF-120 frames.  They have been trimmed to 1.25" end bars.  I put the older queen of the double queen hive from the previous post in this hive.  If I had to guess, I'd say they are eagerly intending to supersede her again as a number of supersedure cells were under construction.  I should keep an eye on this hive to hopefully be able to divide those queen cells up for new hives.

Thursday, February 23, 2012

Two Queens, One Hive

Here for your viewing pleasure is something not often seen.  This is a hive with two queens.  Click to see full size.


Now I've heard of cases where a superceded queen will not be killed off and the new queen will lay along side her mother.  But I've never heard of it lasting this long.

Last spring, I bought the marked queen (C shaped marking) from Zia Queenbee.  She ended up escaping upon being released in her new hive and I found her being balled at the entrance of another hive.  She has always looked greasy, I don't know why.  I was not surprised to find that she had been replaced last summer.  In her place I found a new queen, the one you see on the left.  After seeing her, I didn't keep looking.

Surprise surprise this morning, I was checking this hive for the first time this year and I found the old marked queen.  I looked on the other side of the frame and there was the new queen.  I did put the new queen on the same side as the old one so I could get a good picture, but other than that, what you see is what you get.  No tricks, no Photoshop, no special effects.  That is two queens in the same hive for at least six months including over winter. 

Saturday, January 28, 2012

Behold, the Parker Cube Hive!

A while ago, I decided to build a set of square hives.  Traditional Langstroth hives are 19 7/8" long and 16 1/4" wide.  I think it had something to do with the size of a wine box at the time. 

So I decided to build a hive that was the same length as it was in width.  Inquiring at Beesource, I discovered that this idea was not new and that there are square hives in other countries.  At some point I discovered while building it in Google Sketchup, that three mediums is about 19 7/8" tall.  Presto, three medium hive is a cube hive.  Coincidentally, it's also approximately equal to three deeps depending on how you calculate the comb area.

Some benefits I'm expecting:  more efficient use of wood, shorter hive, more spherical cluster, bigger hives, and the ability to place successive boxes at 90 degrees to one another.

Here's a picture of a deep I made to help make the transition from deeps to mediums.  12 standard frames fit comfortably.


Here are frames trimmed to 1 1/4".  Notice you can fit 14 frames and not be tight at the ends.

Finally, as I mentioned above, three mediums forms a cube.  It's not precisely a cube on the inside due to the thickness of the wood, but that won't stop me from calling it the Parker Cube Hive.  

Hopefully I'll get the opportunity to utilize them fully this year.

Saturday, December 10, 2011

Building hives and More Inspections

I recently ordered an Oshlun stack dado blade.
What you're looking at is 124 (+/-) teeth of fury!  I'm going to use it to cut frame rests and rabbets for hive boxes as well as use it to cut dadoes for dividers in queen castles and nucs.  This is a pretty good quality dado blade and makes good quality stuff.  The cutters have 44 teeth and the chippers have six teeth each.  This makes for a very heavy set and the motor takes about five whole seconds to spin it up.  But it works fantastically, and I'm going to use it a lot as I'm building my new legion of medium boxes.

Here you can see my design for a 4x5 nuc, that's four five frame nucs in one box.  The last thing to add is the dividers.
I did a test run with the dado blade and made some ends for a 6 frame nuc.  All I need to do is cut the sides and make a bottom and lid and it will be ready to go.  Now that I think about it, it would make a perfect example for my first six frame medium nuc, possibly to overwinter.

Finally, here is evidence that given the opportunity, bees will size the entrance how they want it.
This is a hive in my outyard where the bees reduced the entrance even further than I had reduced it.  As you can see, they still didn't close it all the way off.  For context, this hive has a 1 1/2" round entrance near the bottom.

Another hive on this pallet seems to me to be burning too brightly.  By that I mean they are too big and using their stores too fast.  I hope they can slow it down and last the winter.  On the other hand, they are a bit mean, and with that in mind, I doubt I would breed from them.

Friday, December 9, 2011

First Deadout of Winter

Here's today's yard.
 Sad news, today I discovered my first deadout of the winter.  I've gotten better at knowing a deadout without even looking inside.  Bees will be coming and going, but they will be acting more like robbers and in this case, they will be trying to use the lower entrance which this hive never took to.  Around here, dead hives not uncommon for this time of the year, but the reason varies.  Let's look at some of the signs.  What's left of the hive (all the uncapped honey) is located in the back middle of this picture.  I figure any hive able to be out flying through the winter can have all the honey they can carry home.  The hives headed by the queens I ordered from Zia seem do be flying just fine in 45 degree temperatures.

The first thing I found was this in the second box from the bottom.
At first, I thought the hive was queenless because the queen wasn't in this cluster.  There was a hive beetle though.  There was also plenty of honey around the cluster, though it was uncapped.

As I began to take the hive apart and take stock, I found this right at the top of the hive right under the sugar.  Like the lower cluster, they were surrounded by uncapped honey and you can see in this picture just how close it was.  They also had a very healthy supply of pollen.

There the queen is.  She looks like a standard Italian if not just a little dark complected.  This hive was a swarm I caught last spring, and I saw old used queen cells in the hive so I assume this is not the queen that swarmed with the hive.

I also took a good hard look at the bottom board.  That's one of the most important things to look at.  There were about half a dozen beetles and about two dozen mites.  Neither of these things is likely the source of the demise of this hive.  There were dead bees, but not enough to form a solid layer across the bottom.

The primary issue with this hive seems to me to be a divided cluster.  But the question must be asked as to why their population is so low.  I checked my records and this hive was designated SW-NWA-0000-0004 meaning that it was a swarm from around here with unknown parentage.  This hive mysteriously showed up clustered under my comb melting vat last year.  It made it through last year well enough, but had a tough start this spring taking heavy damage from skunk predation.  This apparently triggered a supersedure this spring.  Later on, the hive was healthy enough to harvest three frames of honey from to supply some new nucs.  This hive did show some minor signs of dysentery this spring, but every thing cleared up.  By fall inspection time, they were just about the least provisioned of any of the hives and I put a top feeder on.  They did not take much syrup, and I found what they did take (it was dyed) on one of the combs.  Most of what they had was real honey.

I did my best, but this hive was never a performer.  Perhaps in the future, a hive like this will be placed in a nuc or combined with another hive so that it won't be taking up valuable equipment.  However, at this point, I have plenty of equipment so it's not really an issue.  They ended up being comb babysitters more than anything.  So far, survivors are 10 of 11.  Let's hope there will be very few more deadouts.  It's another big splitting year next year.